
Shape Your Wardrobe with these 12 Stunning Styles
March 3, 2025
Essential Tips on Modern Tiles for Skirting Walls
March 3, 2025
Have you noticed bubbles or blisters developing on your newly painted surface? These infuriating imperfections can wreak havoc with the smooth finish you had envisioned when beginning the project. Wall painting bubbles—or blistering of paint—occur when air or moisture becomes trapped underneath the paint film. This results in unsightly bubbles that detract from the overall look, whether painting an interior room or the exterior facade of your house.
Wall painting bubbles can be easily remedied if you understand their causes, such as poor surface preparation or environmental factors that lead to bubble formation in wall paint. Here, we explore what causes these paint imperfections, how to repair them quickly, and most importantly, how to prevent further incidents in the future.
By understanding their causes and effectively managing them, paint blisters can be avoided in future painting sessions, and your finish will always appear smooth and professional-grade. Let’s get into more about the blistering paint and bubbles.
What Are Wall Painting Bubbles?
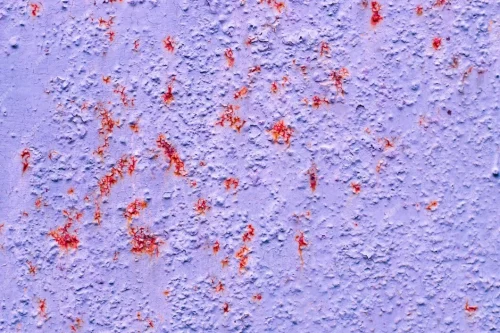
Wall painting bubbles, more commonly referred to as blistering, are raised, bubble-like patches that form on painted surfaces when air or moisture becomes trapped between the paint film and its target surface, forcing its way in. When this happens, this air or moisture pushes against it, causing blisters or bubbles in the form of raised areas within it, causing blistering of paint in its vicinity - creating the same result as what we commonly refer to as blistering but without.
This issue can occur inside and outside, though its source may depend on your environment. Excessive humidity or lack of surface preparation before painting could be at fault inside a home.
If left untreated, bubbles may grow further until peeling occurs, causing further damage to the area. However, fixing wall painting bubbles is a straightforward process requiring identifying its source before taking steps necessary for repair.
Read More: Guide to uPVC Arch Windows
Causes of Wall Painting Bubbles
Various factors contribute to wall painting bubbles. Understanding their source allows us to take preventative steps in future painting projects. Let's discuss some of the more prevalent causes:
Moisture Can Get Trapped Behind Paint Finish
Suppose a surface wasn't completely dry before painting or moisture seeped in from outside sources. In that case, moisture can get trapped under the paint film and eventually evaporate or change temperature, causing bubbles in its place.
Solution: Always ensure the wall is dry before painting it. If painting in areas with high humidity, use a dehumidifier for quicker drying times. Improper surface preparation (without proper surface preparation) cannot be avoided.
Painting over a dirty or oily surface.
Solution: Before painting, thoroughly clean the surface using mild detergent or degreasers to eliminate dirt, dust, or oil that has been collected. Humidity and weather conditions will also affect results.
Painting in humid or rainy conditions.
This can cause the paint to react with excess moisture in the air, leading to uneven drying and bubbles forming on the surface.
Solution: Choose a day with low humidity before painting. To minimize this risk, always follow the manufacturer's recommendations when thinning paint, and thoroughly mix your product before use.
Problem of applying too thick of a coat
Solution: Instead of applying one thick coat of paint, apply multiple thinner coats instead. Allow each coat to dry thoroughly before proceeding with the next.
Low-Quality Paint: Cheap or older paint may contain impurities inhibiting adhesion, leading to paint blisters. Low-quality paints may contain too many fillers, which don't bond properly to surfaces and may eventually cause the peeling and bubbling of paint layers over time.
Solution: Purchase high-quality paint that suits both the surface and environmental conditions.
Steps for Fixing Bubbled Wall Paint
Here are the steps for fixing bubbled paint and returning your walls to their former finish:
Let the Paint Dry
Before trying to repair wet paint, allow it to fully dry before making repairs. Doing so could worsen existing issues and make fixes harder than necessary.
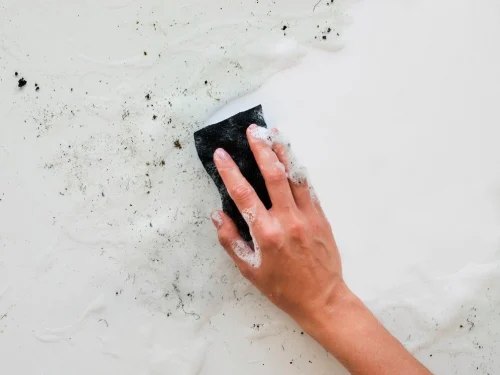
Once dry, use a pin or sharp object to puncture any air or moisture trapped within bubbles by gently puncturing with a pin to release any trapped air or moisture and smooth away any remaining uneven areas.
Smooth the Area
Once the bubbles have burst, use a putty knife or your fingers to smooth over the area and remove any loose paint or debris.
Repaint the Affected Area
Once smoothing has occurred, you may require another coat of paint in the affected area. A small brush should be sufficient to cover any bubbles while feathering edges to blend seamlessly with the surrounding paint.
Consider Applying Primer
If the bubbles were caused by poor adhesion or moisture, using a primer before repainting may help strengthen the bond between your surface and the new coat of paint, helping prevent future bubbles. A primer forms an even stronger connection with its new coat of paint for long-term results that minimize bubbling.
Touch Up Larger Areas
In cases with widespread bubbles, it may be necessary to strip the paint and start over using proper surface preparation and painting techniques.
Read More: Modern uPVC vs. Classic Wooden Windows
Once you have successfully repaired wall painting bubbles, the next step should be to avoid future issues. Here are a few suggestions for creating a bubble-free finish:
Proper Surface Prep Preparation is required.
Before painting any surface, it must be thoroughly prepared for adhesion—dust, oil, or grease can impede adhesion and lead to bubbling of the paint job.
Be Sure to Select High-Quality Paint
Always select high-quality paint suited for the surface on which you are painting. A higher-grade product will ensure better adhesion and reduced bubbling for a more long-term finish.
Paint on days with low humidity to maximize paint drying and avoid bubbles.
Humid weather prevents the paint from setting correctly and may result in bubbled wall paint.
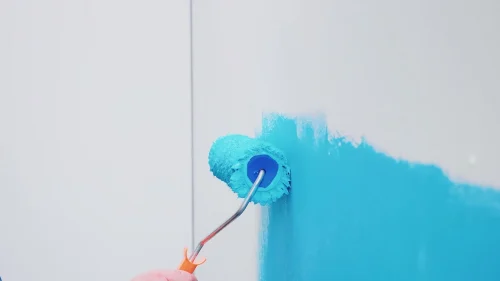
Apply Thin Coats.
It is best to apply thin and even layers of paint, allowing each to dry completely before adding another coat. Thick coats tend to trap air and moisture beneath, leading to bubbles underneath.
Utilise Primer
A high-quality primer can create a solid base that decreases the chances of bubbling on surfaces prone to moisture or poor adhesion, providing invaluable foundational protection.
Wall painting bubbles can be annoying, but understanding their source and solutions will enable you to tackle this issue confidently. Be it moisture, improper surface preparation or environmental factors, getting to the source of future bubbles will be the key to successful paint jobs.
Follow these steps to repair blistered paint on walls, and you can transform their appearance. From popping bubbles to repainting with primer, these simple steps will help to prevent the paint on the wall from bubbling.
Remember that proper preparation is the key to avoiding paint bubbling on walls. Clean surfaces, high-quality paints, and thin coats applied under optimal weather conditions will all go a long way toward ensuring your walls look their best.
Read More: 10 Stylish and Modern Cupboards for Bedroom

Discover GreenFortune - Your Trusted Partner for Top-quality uPVC Windows and Doors
GreenFortune is your go-to solution for providing energy-efficient windows and doors with visual appeal, long-term performance, and premium comfort for your home improvement project. Our windows and doors will add visual appeal and provide long-term performance with premium uPVC solutions made specifically for each application.
Choose GreenFortune now and experience our extraordinary quality, design, and customer service.
(FAQs).
1. What Causes Bubbles in Wall Paint?
Wall paint bubbles may result from moisture trapped beneath it, improper surface preparation, painting in high humidity, or using inferior-quality paint. These factors prevent the paint from adhering correctly to your walls, leading to raised bubbles or blisters.
2. How Can I Fix Bubbles in Wall Paint?
To address paint bubbles, allow the paint to fully dry before gently popping them with a pin and smoothing them out with a putty knife. Repaint the affected area using a thin coat of paint with even coverage for best results. Consider applying primer before repainting to improve adhesion and avoid future bubbles.
3. How can I prevent future paint bubbling?
To reduce paint bubbles in the future, appropriately prepare and clean your surface with high-quality paint before painting, apply thin coats, and paint in dry and low humidity conditions. Primers help improve adhesion for surfaces which tend to bubble.